Tag Archives: planters

let it rust

Picasso and on occasion other artists have been credited with the quote that goes something like, “Good artists copy, great artists steal.”

Getty garden

Left: Garden at the Getty Center, Los Angeles [ source ]

The garden designed by Robert Irwin at the Getty Museum in Los Angeles has both received raves and been the topic of rants. After my visits there I’m torn somewhere in between. There are things I like about it, and there are things that seem like missed opportunities or inappropriate choices.

One of the things I really like is its use of sheets of steel for retaining walls. (You can see it in the foreground and middle-ground in this picture.)

Each material that you use in a garden–whether it be wood or stone or steel–has its own personality. I particularly like the warm brown color that that steel ages to, as well as the industrial vibe that it brings.

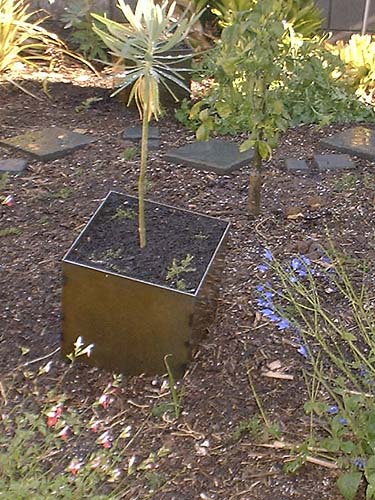
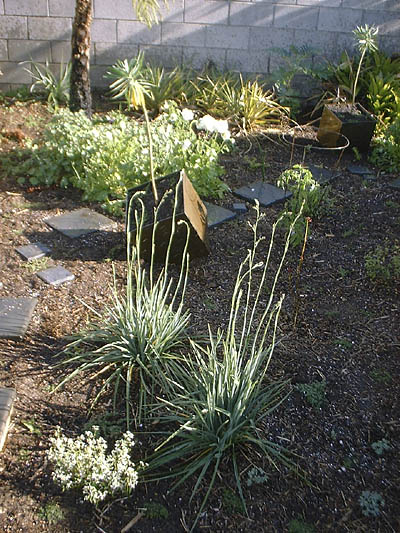
While it probably doesn’t rise to the Picasso’s level of theft, using sheet steel for retaining walls is an idea I’ve incorporated into my own garden. Two sides of the raised bed I put in last fall use the material.

Steel retaining wall

Steps in steel retaining wall

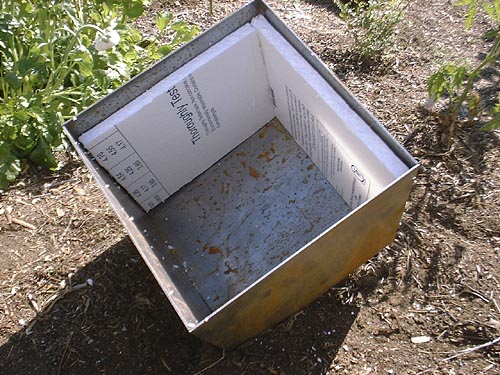
My gardening budget is nothing like the Getty Museum’s, so instead of inch-thick material I used 11-gauge sheets (just shy of 1/8 inch thick). Also, since steel is heavy stuff, thinner sheets don’t require heavy equipment and can be handled by two people. I welded inch-and-a-half angle iron to the top edges, both to give it extra rigidity to help hold back the soil and to give my scrawny little sheets some visual heft.

Patina on steel

Over eight months the walls have taken on a warm patina and are almost as alive as the plants in the bed.

I don’t consider myself to be mainly swayed by practicality over aesthetics. Since steel rusts and degrades over time, using it for a retaining wall is probably a less durable option than using other materials. Still, as far as the longevity of the steel is concerned, I’m encouraged by a scrap that I’ve had outdoors for the last ten years. When I cut into it recently the interior was pristine and shiny. Only the outer shell showed any signs of rust. Of course, steel that’s in constant contact with the ground and moisture–like my garden retaining wall–will degrade quite a bit faster.

We’ll see whether this is a five-year solution or one that will outlive me.

steel cube planters, part 2

Below are instructions on constructing the steel planters I discussed in my last post.

For each planter, you’ll need:

  • 5 sheets of 12-guage steel, cut perfectly square (I used pieces 1-foot square)
  • disposable welding supplies: either welding wire or steel electrodes

Tools:

  • welder
  • 90-degree corner clamps (aluminum Pony clamps work well)
  • the usual welding protection: welding shield, gloves, sturdy shoes, long sleeves and long pants

Assembly:

  1. Clamp the sides together in a way that the final bottom piece will be able to slide into the assembly at a slight slant.
  2. Tack the pieces together using 3 1-inch beads per corner, making sure to leave room for the bottom piece to fit into the planter without running into the welds. Also make sure that two adjacent sides will have their lowest welds a little higher up to be able to accommodate the slanted bottom piece. (You could also use a slightly under-sized bottom panel so you could us it without slanting it, maybe 12 x 11 1/2 or so, depending on how much drainage you want.)
  3. Slide the bottom piece in at an angle, tilting it a little bit extra to not make the fit too tight, leaving slight gaps for water to drain.
  4. Tack weld the bottom in several locations.

That’s basically it. It’s a good idea to clean off the oils from the mill using a degreaser or strong detergent. That step will get the rust started. But if you’re anxious to get patina quicker, you can use a weak solution of acid. I used a stop-bath strength dilution of acetic acid from one of my old photo darkroom bottles, but I’ve heard that vinegar (basically acetic acid as well) works just fine as well. Be sure to wear gloves and eye protection, and don’t inhale the nasty fumes! The finish won’t be totally rusty, but it’ll give you a good head start to a nice patina.

A lot of people swear by weak pool acid (aka muriatic or hydrochloric acid), but you’re getting into territory where the materials start to get unnecessarily powerful. You might be in a rush to get more patina faster and think that using strong acid is the way to go. But when the acid gets too strong, it actually removes rust, so staying with something weak and safe is the best way to go. If I haven’t deterred you, though, check out the discussion at Metalgeek for a moderately safe method for the truly impatient.

One little final finesse concerns the use of insulation. Plants in pots often suffer from roots that have to abide wild temperature swings far beyond what they’d experience in the ground. I’ve always felt that metal containers, with their spectacular abilities to transmit heat effectively, potentially could make for some of the most hostile root environments. So I decided to insulate the sides of the pot that would be facing the most intense sun. This heavily canted cube in particular cried out to me for some protection from the extreme heat of the midday rays…and I just happened to have some leftover 1/2 sheet insulation sitting around. So, before I planted the cubes, at least one of the sides got a piece of insulation to moderate the worst of the sun’s heating effects. Here’s a peek inside:cubesinsulation.jpg

All this is a grand experiment. The insulation may or may not make a difference. I’m sure the cubes will eventually rust out, though hopefully not for ten or more years. In hindsight, priming and painting the interiors might have given the planters a bit more life, but the euphorbias planted in them will eventually outgrow their homes anyway.  What in a garden is forever?

steel cube planters, part 1

This is the result of one of my weekend projects:

cubessingleplanted.jpgIt’s one of four steel cubes that I assembled to put in the new raised bed. The sides of the bed are made of sheet steel that’s already weathered to a rich, warm, rusty patina, so I wanted some pots to put in it that were of the same material.

John vetoed my first avant-garde conceptual ideas for arrangements, arrangements that worked with competing systems of geometrical hierarchies, one of them based in part on some of the ideas behind Bernard Tschumi’s postmodernist and highly conceptual Parc de la Villette in Paris. But below is one that I finally came up with that makes us both happy. It has some of the geometrical tensions that I wanted to work with. At the same time, the arrangement of the elements is a little chaotic and whimsical–to the point that none of them sit flat on the ground–a quality that appealed to John.

Each pot is planted with the identical plant material. Euphorbia lambii is placed in the center, pointing as perfectly upright and away from the earth’s core as I could manage without getting out the level, an effect that I’m hoping will point out how crookedly each planter is placed. Creeping thyme will eventually protect the top of the slanted top plane of potting mix.

This is an overview of two of the other containers in the garden space, here in the middle- and background, with part of the new stepping stone pathway:

cubesoverview.jpgIf you have basic of welding chops and a supplier that will pre-cut pieces fairly accurately, you can make them yourself in an afternoon. You could also make similar containers by screwing the steel plate to little pieces of angle iron. Part 2 of this post provides some basic instructions for the welded version shown here.