All posts by James

a mountain of plastic pots

I had a mountain of unwanted plastic pots, mostly in the 3-5 inch size, leftovers from when I was growing more than just a few orchids around the house. The pots were used, a little old, but basically functional. I couldn’t part with them–who knows when I’d need them? After a couple years of goading from John, a couple hundred of them went to the landfill last fall.

Then I heard about the Missouri Botanical Garden having a great idea. They’ve started up a program to recycle those unwanted leftover plastic pots into something useful.

Garden pots and trays have been recycled into landscape timbers, useful for building retaining walls and landscape borders. Each timber measures 7-inches X 9-inches by 8.5 feet long, weighs 280 pounds, and lasts for up to 50 years.

Well, yeah, Missouri would be a little far to go next time I have a pile of pots I need to part with. But I’ll be a little more diligent in looking around for more sustainable solutions than dumping them!

color resources

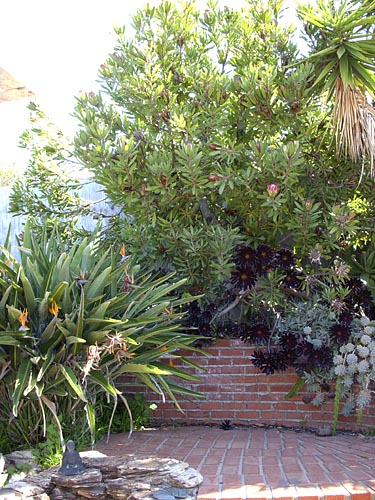
Here’s the side view of my studio. The colors are pretty atrocious and I wanted to try out some different options.

Colourlovers lets you play with colors in lots of ways, and I started there. I used their tool to extract some of the general colors of the studio from the picture above. I can’t change the brick easily, so the orange-red color is pretty much a given. I want to use foreground plantings that are mainly green, though I’ve already planted a Loropetalum chinense var. rubrum ‘Plum Delight’ which has vivid purple foliage much of the year. I made a “before” swatch combination incorporating the green and purple foliage with an orange that generally represents the brick. I also used the gray and army green colors from the studio for the first swatch. Those are the colors I want to play with modifying.
Studio: before

My current main idea is to do something a little more daring with the basic color, probably some in the intense blue to blue-violet range. I think the plant colors would look pretty amazing against it. About the time I redo the siding on the studio the patio will also get redone, most likely with charcoal gray/black uprights to mirror some charcoal supports I have going on in the front of the house. I’ll stare at the new swatch below to see if it really would be as cool as I think it might be. And if I don’t like that one, maybe something like the second alternate, something using rusted steel to cover the eaves and a dark, warm gray on the building… And if I don’t like those options, changing swatch colors is lots more workable than repainting everything.
Studio: option 1

Studio: option 2

While you’re at the site you can also take your swatches and turn them into plaids or stripes or a whole bunch of other patterns. A few months back I was spending waaaaay too much time playing at Colourlovers!
Studio Plaid 2
Studio 1

A similar resource, one that’s devoted just to swatches, is Adobe’s Kuler. It’s not as social a place as Colourlovers, but the interface is beautifully designed. Also, you’ll probably find more professional palette options that people have contributed. Enjoy!

giant staghorn fern

The graphic at the top of this blog is based on a picture of a giant staghorn fern that I’ve been growing for the last decade or so. This is the plant:staghorn
The board it’s mounted to is four feet across, so you can get a sense for how big it is. As far as these larger staghorns go, it’s a teenager. This could easily get 50% larger over time. But even at its current size, people stop and comment.

The plant came labelled Platycerium grande, but I’m now convinced it’s actually the species superbum. (Edit April 10, 2011: Bob in a comment below wondered about which species this was, and I went off and did more research about how to tell these two species apart. The plants appear really similar at first glance. The main diagnosis is whether there are one or two of the patches with spores on the fruiting fronds. P. grande has two patches, P. superbum has one. My plant has the single area where the fronds first branch, so I’m sticking with P. superbum. Apparently superbums are commonly mislabeled grande in the horticultural trade.) As with other staghorns this species produces two kinds of fronds. Sterile, basal ones grow downward and serve to attach the plant to the trees it grows upon in nature. The more decorative fertile fronds grow up and out into the wild forms that earn these plants their “staghorn” name. These latter fronds can divide themselves into upright structures that do not bear spores, and lower ones that do.

Some resources like Staghorn Ferns at a Glance call this a “difficult” species, though that hasn’t been my experience in Southern California, maybe because excessive rains aren’t a problem. For a fern the plant doesn’t seem to care for huge amounts of water. A shot of water once a week or so keeps it happy. It lives on the north-facing side of a fence, so it get only small amounts of direct sunlight. The garden has seen some light frost over the years, and the plant stays outdoors through it all.
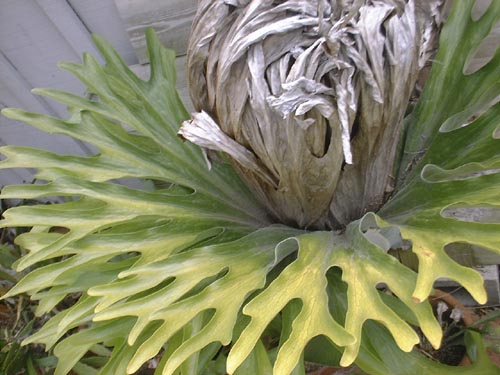
view of staghorn from above
A view of the staghorn from the top

Probably the trickiest part of dealing with the plant is moving it around and “repotting” it. The original plant came attached to a board that was about a foot square. As the plant grew I screwed the original board to boards of rot-resistant cedar, secured from behind to pieces going 90 degrees from the main support boards. That first change of supports was to one two feet square. When the plant outgrew it I attached that second support to the current support. To reduce the bulk of the previous support I carefully removed the backing boards that held the planks on the front face together. The fern had attached itself to the boards in the meantime, so it held the boards in place until I attached them to the new support.

Some growers attach sphagnum moss onto the boards where the fern will expand, but the last time I skipped that step and the plant has been happy enough with that decision. As the fronds die and are replaced with new ones, the old fronds decompose slowly, providing an area where moisture and nutrients can gather.

garden photography: beth dow

I was looking at some of the work of the six finalists who’ve been invited to submit book proposals as part of the Critical Mass photography competition. One of them, Beth Dow, has a beautiful body of work based on formal gardens, many of them landmarks like Sissinghurst or the grounds of Blenheim Palace.


Beth Dow: Standard, Little Moreton Hall, platinum palladium print, 8.5×16″ image, image copyright Beth Dow [ source ]

The images acknowledge the geometries of the gardens, and there’s no doubt that these are human-organized landscapes. My favorite images play with that geometry, not just presenting it, but using the four edges of the photograph to both contain and animate the forms before the lens.

I’d submitted some work to the competition that I did in the late 90s while I was Artist-in-Residence at Yosemite National Park. Although I wasn’t one of the book finalists I was selected as one of the “Top 50,” with the portfolio to be feature online. I’ll link to it once it’s up.

carnivorous plants in action

I’ve had a couple recent posts on insects. While I’ll on the subject it looks like there’s a whole subculture of insect snuff films on YouTube. Notice that the “no animals were harmed during the filming of this video” assurance appears nowhere on any of these videos… Here are a couple showing droseras in action:


You can read up on how the insides of the sarracenia pitcher plants are lined with hairs that point downwards, into “the drink,” making escape almost impossible for small insects. Or you can see it for yourself:

And what collection of carnivorous plant videos would be complete without one showing a venus flytrap doing its thing:

ant farm[ers]

So…you think humans are the only critters who farm and garden? Think again. From a Science in Brief column in yesterday’s LA Times comes this about ants:

Study finds ants longtime farmers

Ants took up farming some 50 million years ago, according to researchers who traced the ancestry of farmer ants.

An analysis of the DNA of farmer ants traced them back to an original ancestor — a sort of Adam ant, at least for the types that raise their own food, according to a paper published in the online edition of Proceedings of the National Academy of Sciences.

In the last 25 million years, ants have developed different types of farming, including the well-known leaf-cutter ants. Leaf-cutter ants don’t eat the leaves they collect. Instead, they grow fungus on the leaves and eat the fungus.

Only four types of animals are known to farm for food — ants, termites, bark beetles and, of course, humans. All four cultivate fungi.

If you have online access to that journal, you can read the full article at: http://www.pnas.org/cgi/reprint/0711024105v1. There’s no research on whether ants prefer to create formal gardens or naturalistic ones, though I’d guess aesthetics aren’t hight on their list of concerns.

To that, I’d also add that some ants are also livestock farmers in that they cultivate other animals. Aphids and ants have a symbiotic relationship, with ants tending aphids to share in the sweet nectar they exude. And all last year we had a major ant trail leading from the ground into the grapefruit tree, where ants and scale insects had set up shop on the skins of the young grapefruits. It didn’t seem to affect the grapefruits too much, though we always had to remember to scrub them clean before serving them up. Here’s a link to a related story on ants and scale insects in tropical coffee plantations.

garden cat and abu ghraib in 3-d!

3dface.jpg

I’ve written about our cat Scooter. A while back I’d bought myself a Sputnik camera, and old Russian roll-film camera that takes two pictures simultaneously, each of them of the same thing, but with separate lenses spaced about the same distance as a pair of eyes. With a special stereo viewer or by making what’s called an anaglyph you can reconstruct the scene giving you a 3-d effect. When I took the camera outside on the first day I had it Scooter followed me out.

Above and below are a couple anaglyphs made from images shot during that session. If you have a pair of red/cyan 3-d glasses you can see the image in stereo. (A red/greed pair will work as well, though not as well. Clear glasses that use polarized light won’t work for teasing apart the separate images in the anaglyph.) I constructed the anaglyphs in a way that would still make sense to viewers without the 3-d glasses, in a way that features the star of each picture…

3dtail.jpg

As much fun as I had outside with the cat I hadn’t bought the camera to take more wonderful cat pictures. George Bush’s Iraq War was chugging along full steam and the notorious pictures from Abu Ghraib had recently surfaced. The world was pissed after seeing them and so was I. Politics seeps into my art in various ways, most of them subtle, but I started a small serious of pieces addressing the Iraq war. Below is one of those works, a 3-d photomontage combining staged elements along with one of the most infamous war images of recent times. It’s a complex response, combining what might look like humor with a seething rage I still harbor towards a war launched by a man who’s now been responsible for more American deaths than the number of those who died in the September 11 attacks in New York. And that’s only a fraction of those who’ve been killed.

3dcancanfinal.jpg
James SOE NYUN: Le Can-Can Abu Ghraib.

Technical Details: The original Abu Ghraib image was gently dissected and reassembled into two slightly different images that were then composited to give a subtle 3-d image. The foreground and stage were mockups that I staged and photographed twice with conventional cameras, moving the tripod to the side about four inches between exposures. The “dancing” figures were photographed using the stereo Sputnik camera. Two separate composite images were completed using Photoshop, one reflecting what the left eye might see, the other what the right eye would see. The left image was then pasted into the red channels of the final image and the right image pasted into the green and blue channels. The final work is printed fairly large, at a scale approaching narrative history paintings.

Google “photoshop” and “anaglyph” for a pile of resources on how to make your own anaglyphs.


in defense of bees

A lot of nurseries around here tout plants as being hummingbird- or butterfly-friendly. Those little critters are awfully decorative and fun to have around, but the major work of pollination belongs to the bees. For instance the California almond crop supplies something like 80% of the world’s almond exports, and the crop wouldn’t be possible without all the hives that are trucked into the Central Valley about this time of year. According to the Los Angeles Times, farmers now are spending more on renting hives than they are on watering their trees.

A recent article, The Headbonker’s Ball, in Orion Magazine has a great article on the Urban Bee Project, a project headed by UC Berkeley prof Gordon Frankie that’s designed to educate folks about the value of having bee-friendly gardens. Their Urban Bee Gardens site crawls with all sorts of information on the value of bees and what you can do to welcome them into your garden. Some of it’s under construction still, but there’s already lots of useful information there.

One of the cores of the site is a list of plants that are friendly to bees, and the list is broken into spring plants and summer plants so that you can plan a progression of food sources for the little guys. The list is a little Berkeley-centric, though many of the plants on the list would grow plenty of other places. At first you might worry that you’d have to plant oddball ugly plants just to the do the right thing, but incorporating bee-friendly plants requires no such thing. A lot of the selections are really common garden plants, and you probably have a number of them in your garden already: lavenders, penstemons, salvias, cosmos, sunflowers, and the like.

With all the plants out there the list couldn’t possibly list every bee-friendly plant out there.Various thymes, for instance, have a reputation for being major bee party pads. The Berkeley project came to its conclusions by sending people out into gardens and having them count how many bees visited a plant in a certain time period. (Not a bad way to conduct research, eh?) You could do the same. If there’s something not on the list but you notice that the bees like it, why not plant a little more of it? Give the hummingbirds and butterflies some company.

protea pink ice

proteaplant.jpgShown here with its last flowers of a long season that started last fall is Protea x Pink Ice, a hybrid between the species P. compacta and P. susannae. Although one of the growing guides says this stops at 5-7 feet tall, it’s now pushing 10 or more, egged on by a cool and moist winter.

The shrub is well-behaved, and responds well to gentle pruning. But you grow it because of its flowers, and they’re pretty exotic:
proteapinkice.jpg

When I get all piney over not having a cold enough climate to properly grow lady’s slipper orchids or produce even a small apricot crop, seriously cool plants like this begin to make up for what I can’t do.

steel cube planters, part 2

Below are instructions on constructing the steel planters I discussed in my last post.

For each planter, you’ll need:

  • 5 sheets of 12-guage steel, cut perfectly square (I used pieces 1-foot square)
  • disposable welding supplies: either welding wire or steel electrodes

Tools:

  • welder
  • 90-degree corner clamps (aluminum Pony clamps work well)
  • the usual welding protection: welding shield, gloves, sturdy shoes, long sleeves and long pants

Assembly:

  1. Clamp the sides together in a way that the final bottom piece will be able to slide into the assembly at a slight slant.
  2. Tack the pieces together using 3 1-inch beads per corner, making sure to leave room for the bottom piece to fit into the planter without running into the welds. Also make sure that two adjacent sides will have their lowest welds a little higher up to be able to accommodate the slanted bottom piece. (You could also use a slightly under-sized bottom panel so you could us it without slanting it, maybe 12 x 11 1/2 or so, depending on how much drainage you want.)
  3. Slide the bottom piece in at an angle, tilting it a little bit extra to not make the fit too tight, leaving slight gaps for water to drain.
  4. Tack weld the bottom in several locations.

That’s basically it. It’s a good idea to clean off the oils from the mill using a degreaser or strong detergent. That step will get the rust started. But if you’re anxious to get patina quicker, you can use a weak solution of acid. I used a stop-bath strength dilution of acetic acid from one of my old photo darkroom bottles, but I’ve heard that vinegar (basically acetic acid as well) works just fine as well. Be sure to wear gloves and eye protection, and don’t inhale the nasty fumes! The finish won’t be totally rusty, but it’ll give you a good head start to a nice patina.

A lot of people swear by weak pool acid (aka muriatic or hydrochloric acid), but you’re getting into territory where the materials start to get unnecessarily powerful. You might be in a rush to get more patina faster and think that using strong acid is the way to go. But when the acid gets too strong, it actually removes rust, so staying with something weak and safe is the best way to go. If I haven’t deterred you, though, check out the discussion at Metalgeek for a moderately safe method for the truly impatient.

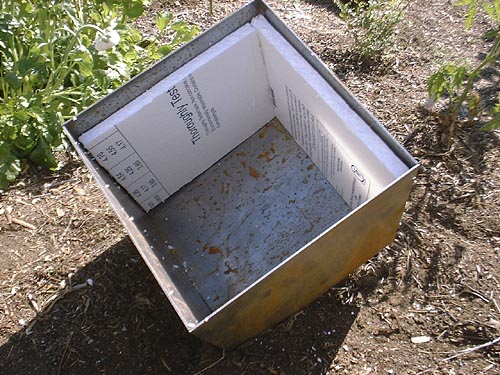
One little final finesse concerns the use of insulation. Plants in pots often suffer from roots that have to abide wild temperature swings far beyond what they’d experience in the ground. I’ve always felt that metal containers, with their spectacular abilities to transmit heat effectively, potentially could make for some of the most hostile root environments. So I decided to insulate the sides of the pot that would be facing the most intense sun. This heavily canted cube in particular cried out to me for some protection from the extreme heat of the midday rays…and I just happened to have some leftover 1/2 sheet insulation sitting around. So, before I planted the cubes, at least one of the sides got a piece of insulation to moderate the worst of the sun’s heating effects. Here’s a peek inside:cubesinsulation.jpg

All this is a grand experiment. The insulation may or may not make a difference. I’m sure the cubes will eventually rust out, though hopefully not for ten or more years. In hindsight, priming and painting the interiors might have given the planters a bit more life, but the euphorbias planted in them will eventually outgrow their homes anyway.  What in a garden is forever?